In my Bring Your Own: The Basics post I showed you the cutlery wraps I made for each person in my family to carry their cutlery, straw, and napkins in when we are out and about to avoid using disposable ones. In this post I’m going to show you how I made them from scrap material as well as an easier alternative made from old denim jeans. Let’s start with the quickest and easiest…
Denim Cutlery Pouch

I found these wikiHow instructions to make a denim cutlery pouch which I thought was the perfect alternative to a cutlery wrap, after all, you really only need something to keep the cutlery together and clean. This was so easy to make, with no extra parts like draw strings, and a useful way to use old jeans. It’s simple enough to sew by hand if you don’t have a sewing machine. Give it a go.


For interest sake, I also made these oven mittens and mini pots for my kids from the jeans. I used my old socks as the padding inside the mittens.


Cutlery Wrap

I made our cutlery wraps before I started blogging and I made it up as I went, so don’t be afraid to do the same. I also made the wraps from scraps of material. It’s my number one rule to try and use what I have already before buying anything new or secondhand. It’s one of the best ways to reduce waste and the amount of resources you consume.
These wraps have the benefit of being able to be used as a placemat if you feel that will be useful.
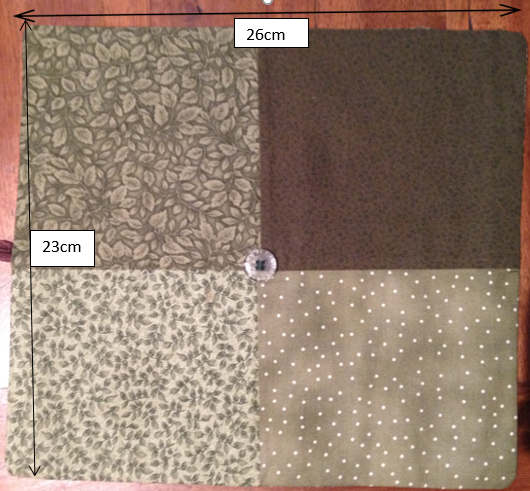
The finished wrap is 23cm by 26 cm long. Start by cutting material slightly bigger than this so that you have space to sew two sides together, or find smaller pieces that can be stitched together. I stitched together four small pieces to make the size I needed.
Make a duplicate piece for the other side. You can use different patterned material if you like.

Cut a piece of material 14cm x 24cm for the cutlery pockets. Check this will be the right size for the cutlery you wish to use. Hem one of the long sides. Now sew this onto the front of the panel that will be the inside of the wrap. Tuck the edges in to make it look neater. Next sew lines at appropriate intervals to create pouches for your cutlery to sit in.
Now sew together the inside of the wrap (the panel with the cutlery pouches attached) to the outside panel of the wrap that you cut/made earlier. Sew them together inside-out leaving enough of a gap to turn the wrap the right way out. Once you have done this sew the gap together.

Next make the top flap which stops the cutlery from sliding out. Sew together a flap 24cm by 12cm, remembering to do this inside-out and leaving a gap to turn it the right way out. Now sew the gap closed and sew the flap near to the top of the wrap.

Finally, I decided to use a button and loop of ribbon to keep the wrap rolled up. Sew a loop of ribbon onto the side of the wrap and check where to place your button by putting the cutlery in your wrap and rolling it up. I found the best place for mine was in the middle. Just be careful when hand sewing the button on that you don’t sew part of the cutlery pouch closed.
No doubt many of you will be much more experienced sewers than me but I really just wanted to show that it’s not that hard to come up with something using the materials you have at hand, and with no prior experience. With different materials I may have come up with a different way of making the wrap. Have fun and I hope this has helped you to get creative.


Great idea! I’ll implement the jeans wrap for school lunches 🙂
LikeLiked by 1 person
They are perfect for that. So easy to use.
LikeLike