Since starting a plastic free lifestyle I haven’t used hair removal wax. Both salon and home treatments come packaged in plastic. I’m mostly happy with shaving (I use a safety razor) but for some areas I prefer waxing. I didn’t want to go down the path of laser hair removal because of the expense, and I didn’t want to add more appointments and travel time into my schedule. So I lamented to my sister that there must be a way to make hair removal wax at home. “Sugaring” she remarked like it was obvious. “Sugaring?” This sounded promising. “Yeah, just melt sugar and use it like wax” she said more enthusiastically. I was into this idea. Apart from being all natural, sugar is easy to get in recyclable packaging, if not package-free from bulk bins.

After some internet research I discovered that sugaring is done by making a paste of sugar, water, and lemon juice that has been heated to the softball candy stage. Apparently you can substitute the lemon juice with lime juice, orange juice or vinegar. The acid in these ingredients acts as a preservative and helps stop the sugar from turning into hard candy. But as I learnt, over-cooking the paste will still make it go rock hard when it cools down. Be prepared for a bit of trial and error, but sugaring definitely works. Another zero waste win!

Making the sugaring paste
Ingredients:
1 cup white sugar
2 tablespoons lemon juice (no pulp or seeds)
2 tablespoons water
Method:
Put all ingredients in a large stainless steel pot to prevent spillage. Cook on medium to low heat, stirring frequently. Take off the heat when the sugar turns honey coloured (the temptation to eat this stuff is high, but I don’t recommend it, it got stuck all over my teeth). This took me about 7 minutes but it will be a bit different for everyone so stay focused. I also tested if it was ready by placing a spoonful of paste in cold water. You can place the spoon in a bowl of water, but I found putting it under the tap worked just as well. You are looking to see if the paste will hold its shape and still be pliable. Transfer the paste to an airtight glass container that has been warmed up so that the glass won’t break. Let it cool to room temperature before using.
Cooking tip: It’s better to take your wax off the heat too soon rather than too late. If it’s not thick enough, you can always heat it more, but if it overcooks it will turn solid. If it turns solid, try adding a tablespoon of water and heating for 10 or 20 seconds at a time in a microwave. When it softens, mix together and use when it cools down enough. I was able to salvage most of my first batch this way.
Safety tip: Please be really careful when handling the sugaring paste, it can cause severe burns if it gets on your skin.


Using the sugaring paste
Some people use sugaring paste like strip wax but that is not how it was intended to be used. If you choose to do this you can use cloth strips made from scrap material, and because sugaring paste is water soluble, the strips will wash easily allowing you to reuse them.
I wanted to stick to the more traditional paste method of removing the hair (sugaring has been commonplace throughout the Middle East and North and East Africa for centuries). I found that it works brilliantly.

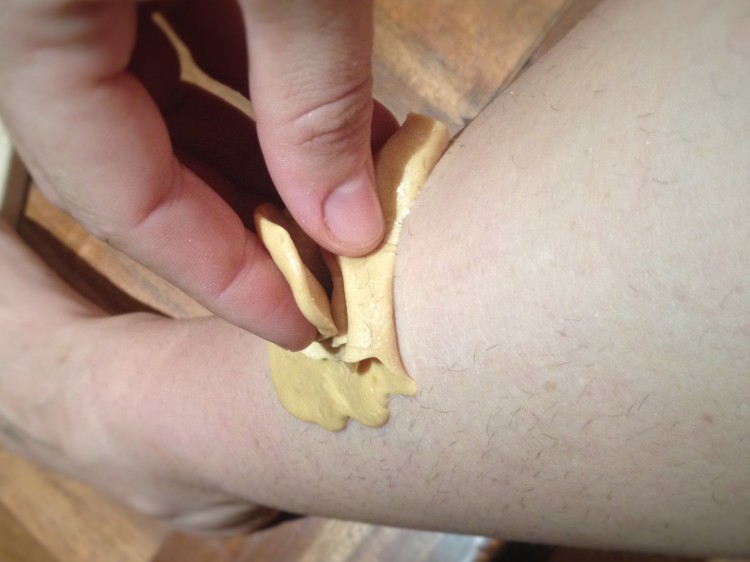
Start with clean, dry skin. Scoop out a ball of paste and drag it over the skin going against the direction of the hair. Then use your free hand to hold the skin taut, while using your fingers and wrist to flick the paste off in the direction of hair growth. Sugaring works in the opposite direction to waxing. You can use the same ball of paste over and over again until you feel it is not useful anymore (very thrifty). It will lighten in colour with more use. Happy sugaring!
Have you ever tried this before? Please share your tips and tricks in the comments.
This post was republished by 1 Million Women, a movement of women acting on climate change through the way we live.


Great stuff! And entirely on time for me, as I have been looking for something for some time. How many times did you try?
Thanks 😀
LikeLiked by 1 person
I have done it twice (I have no more hair left to remove). The second time was much better than the first. But these photos show the paste being used from both those attempts, so I would say do your best to salvage what you can even if you don’t get it perfect, and to use it as it when it cools down enough to be able to handle. That way if it won’t matter so much if it goes hard when it is at room temperature. Have fun with it 🙂
LikeLike
Oh wow thanks for sharing. I’ve heard about it a lot but never tried it. This is what they use in Turkey. Thanks for the recipe 😊
LikeLiked by 1 person
No worries Jey. This tiny amount goes a long way because you can keep reusing the paste. Good luck with it.
LikeLiked by 1 person
This method is amazing on sensitive skin. My skin is super sensitive and because it doesn’t rip like waxing does, I do not get any reaction
I do the diy method everywhere except my eyebrows, where a local salon does it for me 🙂
LikeLiked by 2 people
I noticed this too. No redness at all on legs and only a tiny bit for bikini area. Was definitely gentler and easier to handle for the bikini area.
LikeLike
This is great to know since my skin is also very sensitive. Thanks for sharing! 🙂
LikeLiked by 1 person
No problem at all 😊
LikeLike
Hi Nola, yes I saw this too. I am part of the zero waste bloggers network which encompasses some of these bloggers and the others are zero waste superstars in a league of their own. It’s great to see the movement taking off in other parts of the world. We’re a bit slower in Australia and there still aren’t many families and rural people getting involved. Hopefully I can help bring those numbers up.
LikeLike
Brilliant!
LikeLiked by 1 person
Hi what about doing it with brown sugar? Will it work the same way?
LikeLiked by 1 person
I think you can use any type of sugar. You just need to be mindful that it might be harder to tell when the colour is right because you are starting with brown. Cook for a short amount of time first, then go from there. Let me know how you go.
LikeLike
Tried this and ended up having a bad experience because it was too thick. Please read my experience at http://www.pinkywelove.WordPress.com
LikeLike
I took a look but your recipes are different to the one I used. Perhaps you could try the recipe and directions here in this post with better luck.
LikeLiked by 2 people
Thanks..
LikeLike
Thank you for this great idea!! I’ve been looking for alternatives. I made this last night with raw sugar and white vinegar as that’s what I had even then you can see the colour change. I didn’t cook it long enough so when it was in the glass jar I put it in the microwave for 30sec intervals stiring in between and testing its consistency under the tap. I used it on my mo hair and it worked well enough I did have to pluck out some of the darker thicker hairs but that cup of sugar has saved me a $14 trip to the beautician!! I’ll keep trying this but at this stage I don’t think I can be bothered doing it all over my body but totally worth it on my face!!! Thank you so much! M x
LikeLiked by 1 person
Thanks for the feedback! I mainly use it for upper lip and bikini and shave everywhere else. It’s definitely a little tricky to make but I’m still using my first jar of it so it’s very economical. 😄
LikeLike
Hi, thanks for the recipe!
I’ve been trying to make this stuff a last year and overcooked it 3 times, which made me give up for a while.
But last night I was finally ready to give it another shot! I think I might’ve added to much of the liquids (I’ m european so maybe I didn’t convert the units exactly right), because it was already a lot darker than the stuff in your pictures, but it was still a bit too sticky when I did the cold water test. And then… I overcooked it again. So I added “a bit” more water, which was apparently way too much, cause now it’s cooled down and has the consistency of honey….. I know, I am so bad at this. Can I still save this stuff or should I just make a new batch?
LikeLiked by 1 person
Hi Lina, sorry I didn’t get to this sooner. If you still have the ‘wax’, is it still like honey or has it hardened a bit more? If it is still like honey, try microwaving it for small amounts of time to cook it a little bit longer. Hopefully that works. This DIY is definitely tricky. Some people never seem to have success and others do and I’m not sure why. I haven’t had to make it again for ages so next time I’ll see if I can improve the process.
LikeLike
Does it work as well with orange juice
LikeLike
I followed your recipe to the the T. It was very gooey and wouldn’t come off my skin so I stuck it in the microwave and got it to work for one spot of hair and then my body heat turns it to goo. What am I doing wrong?
LikeLike
What do you do with it after you wax? Is it compostable?
LikeLiked by 1 person
Yes it is or it will dissolve in hot water and wash down the drain.
LikeLike
Hi, Tammy thanks for the idea. However, I would like to add some safety measures after waxing.
Check your skin, look for burns, cuts, & pimples on your skin whilst you wax. Avoid those areas and wax carefully around them.
If you are experiencing any skin allergies and infections, it is most ideal to consult your dermatologist and follow their advice.
People who have diabetes, are pregnant or are on birth pills need to take their doctor’s suggestions before
LikeLiked by 1 person
Thank you Tammy for sharing this zero waste recipe. Approximately what is the shelf life for the paste? And how best to store it – at room temperature? Many thanks.
LikeLike
The sugar and acid act as preservatives so it lasts a while. Mine lasted about a year in the bathroom cupboard before I used it all. I didn’t notice any deterioration.
LikeLike
Thanks Tammy for the helpful information.
LikeLiked by 1 person
I just tried this last week and I could not believe the incredible success I had with it! Tips from reading other posts led me to make a scrub first (with the lemon zest over course! So even less waste!) and use that the day before or earlier in the day to exfoliate nicely before attempting the the sugaring- also to cleanse the area; I used witch hazel aloe rose, then apply baby powder as a protectant between my skin and the wax and it all worked so well. I’m still trying to get a hang of the pulling and reusing at the right temp and consistency so I did some strips with very good results and I’m so proud! I live in California and we have a grapefruit tree so I’m going to try to make some today with grapefruit juice because the lemons are now more sparse while the grapefruits tree in my yard still has plenty. This is a great quarantine activity!!!! Lastly, my skin is usually very sensitive and I was honestly amazed by how it was so much less painful and also barely any pinkness and straight up no redness whatsoever. I applied an “instant soothing moisturizer” I had from a fancy wax salon I went to in London (before I was enlightened with this fab method) and that also helped with the post sugaring/sugar waxing soothing to my skin!!
LikeLiked by 1 person
That’s great Rachel, thanks so much for sharing your experience. 🙂
LikeLike
I just made the wax it is cooling easy to make hoping i can use it right like everyone else. Well let’s see i will write back and tell you if i could remove hair since you can’t go out and get it done. There must be a lot of hairy ladies out there.
LikeLike
Thanks so much for impacting us with your knowledge and time you spend to do research we appreciate.
LikeLiked by 1 person